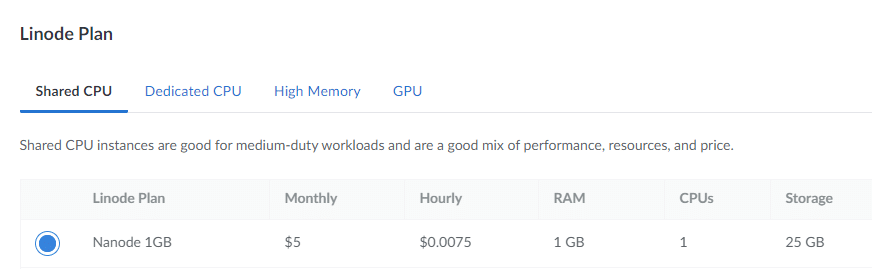
Linode provides affordable cloud compute, storage, and networking services. Their $5/month shared instance plan is a perfect starting point for a WordPress site. I got started with Linode because I wasn't happy with my hosting provider's declining performance and increasing price. Read on to learn how to host WordPress with Linode Marketplace Apps, configure an SSL certificate, upgrade PHP and other tips and tricks.
There are a few things you will want to do before deploying your WordPress node:
If you want to manage your domain DNS records at Linode, you will need to set your domain to use the Linode name servers. Additional information regarding the Linode DNS Manager can be found here.
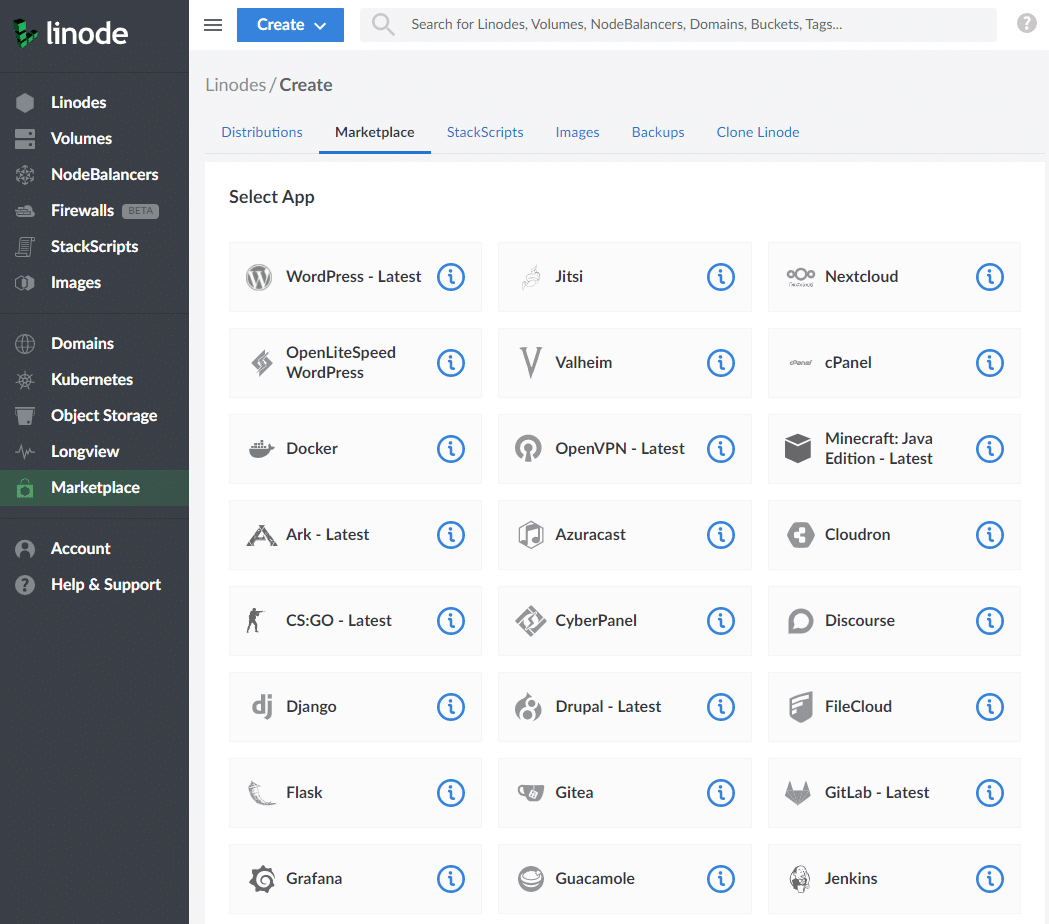
The Linode App Marketplace allows for rapid one-click deployment of popular applications. To deploy the WordPress app:

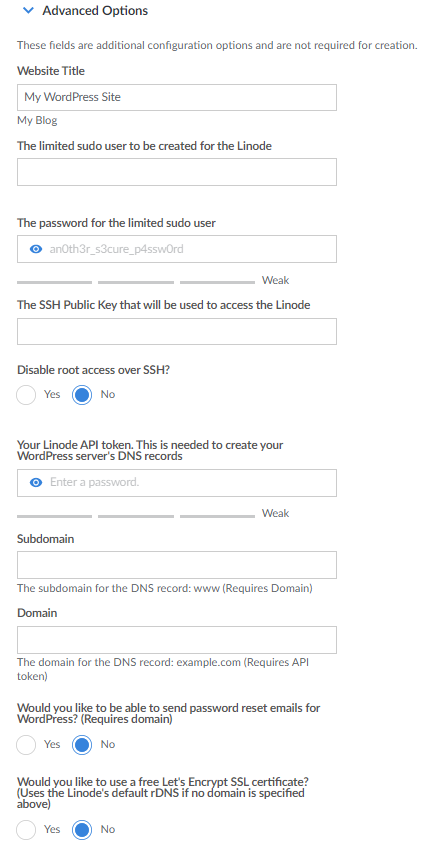
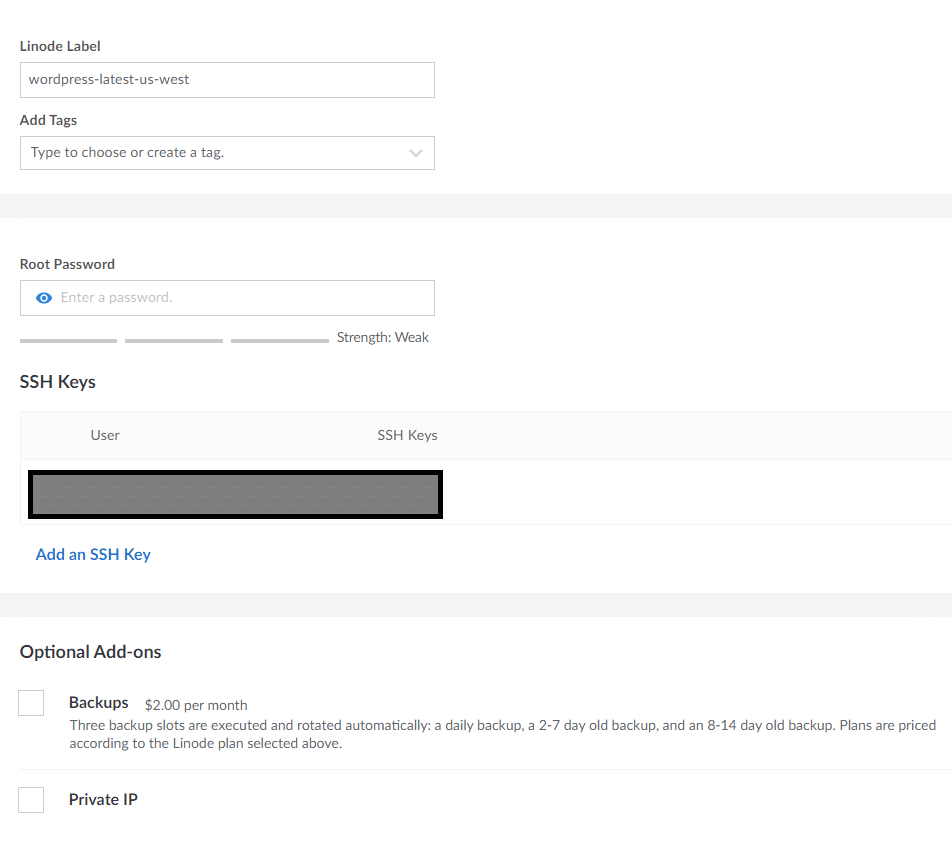
For security, it is recommended that all passwords are different!
Now for the Advanced Options. These are all preset and optional to configure.
Now let's finish up the final remaining options.
Now click the Create Linode button. Your Linode should be ready for use in about 5 minutes.
Once you click the Create Linode button you will be take to the Linode status display. You can also view the status of your Linode by clicking on Linodes in the left hand navigation menu and selecting the Linode you just created.
If you are managing your own domain DNS records you should configure them now. At a minimum the IPV4 and IPV6 host records should be configured.
If you plan to use your Linode to send e-mail or simply want your reverse DNS lookup to resolve to your domain name:
If you did not specify any SSH Keys to use for public key authentication you can configure that now.
You should now be able to SSH into your Linode without having to type in a password.
If you did not request a LetsEncrypt SSL certificate during installation or are managing your own DNS records, let's set that up now:
After setting up the LetsEncrypt SSL certificate, you will probably score a B at SSL Labs. To improve the security of your site and your score, two additional steps are required.
Add a CAA wildcard record to your domain containing the following: 0 issue "letsencrypt.org"
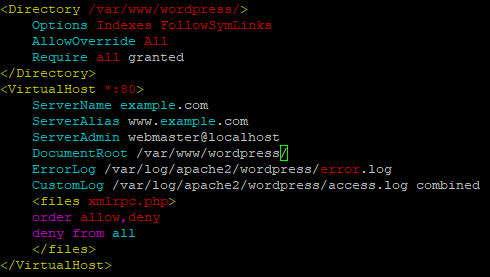
If you access https://your.domain.name or https://www.your.domain name the site may look pretty messed up at this point. However, if you go to http://linode.ipv4.address the site looks fine. This is because Apache is now configured to handle requests for the actual domain name(s) rather than the IP address but WordPress is configured to expect the IP address. To reconfigure WordPress to expect the domain name:
While you are building your site, you probably don't want search engines trying to index it. Make the following changes to prevent search engines from indexing your site:
At the time of writing this guide, the Linode Marketplace WordPress App comes with PHP 7.3. I would suggest upgrading PHP to 7.4. WordPress Site Health (Tools > Site Health) will also complain, stating "Your site is running an older version of PHP". SSH into your Linode and perform the following steps to upgrade PHP to 7.4:
|
1 2 3 4 5 6 7 8 9 10 11 12 13 14 15 |
sudo apt install lsb-release apt-transport-https ca-certificates # Download the signing key sudo wget -O /etc/apt/trusted.gpg.d/php.gpg https://packages.sury.org/php/apt.gpg # Add repo echo "deb https://packages.sury.org/php/ $(lsb_release -sc) main" | sudo tee /etc/apt/sources.list.d/php.list # Update the list of available packages sudo apt update # Install PHP 7.4 and packages sudo apt install -y php7.4 php7.4-common php7.4-xml php7.4-mysql php7.4-pdo php7.4-phar php7.4-simplexml php7.4-curl php7.4-mbstring php7.4-imagick php7.4-zip php7.4-gd php7.4-tidy php7.4-xsl # Check version php -v # Disable PHP 7.3 and enable PHP 7.4 for Apache web server sudo a2dismod php7.3 sudo a2enmod php7.4 sudo systemctl restart apache2 |
Log into your WordPress site and check Tools > Site Health. The PHP warning should now be gone.
The Linode Marketplace WordPress app comes with the Zend OpCache preinstalled. Perform the following steps to ensure it's running:
Using PHP-FPM and MPM Event in an Apache environment decreases the web site page loading time and allows the web server to handle more concurrent connections. The default Apache Multi-Processing Module (MPM) is MPM prefork.
The prefork MPM causes Apache to fork into additional processes before the system receives requests. When the server receives requests, it responds quickly to each request because an Apache process already exists to handle it. If a problem occurs with an individual process, the system can kill the process with no effect on the other Apache processes.
Because the prefork MPM is not threaded, each child process can only handle one request at a time. The system queues concurrent requests and the MPM waits to process each request until the system becomes available. These scaled child processes may use of a large amount of system RAM.
The worker MPM causes Apache to fork into several processes so that a single crash does not kill the entire Apache process. Each forked process creates numerous threads, and a listener thread that listens for connections. This enables the system to serve multiple requests concurrently.
The event MPM serves a single HTTP request across multiple threads. However, the event MPM uses a dedication system and dedicates a thread to handle all live connections. The system allocates a request to the child threads only when it receives a request. This allows the threads instant availability after the request finishes.
|
1 2 3 4 5 6 7 |
# Stop Apache service systemctl stop apache2 # Disable PHP 7.4 module and prefork MPM a2dismod php7.4 a2dismod mpm_prefork # Enable event MPM a2enmod mpm_event |
|
1 2 3 4 5 6 7 8 9 10 11 12 13 14 15 16 17 18 19 |
# Install PHP-FPM sudo apt install php7.4-fpm # Install FastCGID sudo apt install libapache2-mod-fcgid # Enable PHP-FPM, proxy and FastCGI proxy modules sudo a2enconf php7.4-fpm sudo a2enmod proxy sudo a2enmod proxy_fcgi # Restart Apache sudo systemctl restart apache2 # Verify the active MPM module sudo apachectl -M | grep 'mpm' # You should get the following output mpm_event_module (shared) # Verify proxy and FastCGI proxy modules sudo apachectl -M | grep 'proxy' # Should get the following output: proxy_module (shared) proxy_fcgi_module (shared) |
Apache is now configured to use the FastCGI Process Manager. Verify PHP is using the FastCGI Process Manager:
Open your web browser and navigate to http://your-server-ip/info.php. You should see a PHP info page. Check the "Server API" setting and confirm that "FPM/FastCGI" is listed.
The default PHP settings are a little low. Edit the PHP.INI file to increase them.
|
1 2 3 4 5 6 7 8 9 10 |
sudo vi/etc/php/7.4/fpm/php.ini # Locate upload_max_filesize. The default limit is 2 MB. Let's change it to 32 MB #upload_max_filesize = 2M upload_max_filesize = 32M # Locate post_max_size. The default is 8 MB. Let's change it to 32 MB #post_max_size = 8M post_max_size = 32M # Save and exit # Restart FPM sudo systemctl restart php7.4-fpm |
You can view general performance of your Linode over the last 12 hours by viewing its analytics data:
Install Linode Longview for even more information such as swap utilization, RAM utilization, memory breakdown by process, Apache statistics, MySQL statistics and more.
Linode Longview can provide statistics regarding Apache. In order to enable this capability, perform the following steps:
|
1 2 3 4 5 6 7 8 9 10 |
cd /etc/apache2/sites-available cp 000-default.conf longview.conf vi longview.conf # Add the following section inside the <VirtualHost *:80> section <Location /server-status> SetHandler server-status Require local </Location> # Save and exit sudo a2ensite longview.conf |
If you received the MySQL plugin error while installing Longview, perform the following:
|
1 2 3 4 5 6 7 8 9 10 11 12 13 14 15 16 17 18 19 20 21 |
# Log into MySQL sudo mysql -u root -p # Enter your root MySQL password # Enter the CREATE USER command that you copied during the Longview installation CREATE USER 'linode-longview'@'localhost' IDENTIFIED BY 'some_really_long_secure_password'; FLUSH PRIVILEGES; EXIT #Edit /etc/linode/longview.d/MySQL.conf to include the same username and password you just added. It should look like the following: sudo vi /etc/linode/longview.d/MySQL.conf # The file should look like this: #username root #password example_password username linode-longview password some_really_long_secure_password # Save and exit # Restart Longview sudo systemctl restart longview |
The following MySQL optimizations are recommended when running on the shared 1 GB Linode plan.
|
1 2 3 4 5 6 7 8 9 10 11 12 13 14 15 16 17 18 19 20 21 22 23 24 25 26 27 28 29 30 31 32 33 34 |
# Edit the MySQL config file sudo vi /etc/mysql/my.cnf # Add the following lines under [Client-server] [mysqld] tmp_table_size=64M max_heap_table_size=64M query_cache_size=64M skip-name-resolve # Save and exit # Edit the Maria DB server config file sudo vi /etc/mysql/mariadb.conf.d/50-server.cnf # Locate the following line and comment it out. Otherwise, it will take precedence over the my.cnf file # Change query_cache_size = 16M To this: #query_cache_size = 16M # Save and exit # Restart mysqld sudo systemctl restart mysqld # The following command will dump all MySQL settings and options. Browse through the results and ensure the settings that were changed in the my.cnf file "took". mysqld --help --verbose |
By default, the Expires and Headers modules are not enabled. If you want to configure browser caching, perform the following:
|
1 2 3 4 5 6 7 8 9 10 11 12 |
a2enmod expires a2enmod headers sudo systemctl restart apache2 # Check loaded modules sudo apachectl -M You should see the following in the list: expires_module (shared) headers_module (shared) |
If using a plugin such as WP Rocket, the expires headers will be set automatically. To set expires headers, modify the .htaccess file. The following example settings were taken from GTmetrix:
|
1 2 3 4 5 6 7 8 9 10 11 12 13 14 15 16 17 18 19 20 21 22 23 24 25 26 27 28 29 30 31 32 |
<IfModule mod_expires.c> ExpiresActive On # Images ExpiresByType image/jpeg "access plus 1 year" ExpiresByType image/gif "access plus 1 year" ExpiresByType image/png "access plus 1 year" ExpiresByType image/webp "access plus 1 year" ExpiresByType image/svg+xml "access plus 1 year" ExpiresByType image/x-icon "access plus 1 year" # Video ExpiresByType video/webm "access plus 1 year" ExpiresByType video/mp4 "access plus 1 year" ExpiresByType video/mpeg "access plus 1 year" # Fonts ExpiresByType font/ttf "access plus 1 year" ExpiresByType font/otf "access plus 1 year" ExpiresByType font/woff "access plus 1 year" ExpiresByType font/woff2 "access plus 1 year" ExpiresByType application/font-woff "access plus 1 year" # CSS, JavaScript ExpiresByType text/css "access plus 1 year" ExpiresByType text/javascript "access plus 1 year" ExpiresByType application/javascript "access plus 1 year" # Others ExpiresByType application/pdf "access plus 1 year" ExpiresByType image/vnd.microsoft.icon "access plus 1 year" </IfModule> |
I also had to add the image/webp type to the .htaccess file as follows:
|
1 2 |
# Add the WEBP Image Type AddType image/webp .webp |
Your WordPress Linode should now be up and running, properly configured and optimized. Happy hosting!